How to Wet Sand a Car
Even the most careful car owners can’t escape the inevitability of finding little scratches and scuffs caused by bushes, trees, and sometimes even the weather. While finding these imperfections on your car’s surface can be disheartening, it doesn’t necessarily call for a complete car paint overhaul.
Wet sanding can help to remove these tiny imperfections without damaging excessive amounts of the surrounding paintwork. By using sandpaper and water or other lubricant, you can restore your car’s paint to its former glory in just five easy steps.
In this blog, we’ll tell you everything you need to start wet sanding, what you should know beforehand, and what results you can expect.

What is wet sanding?
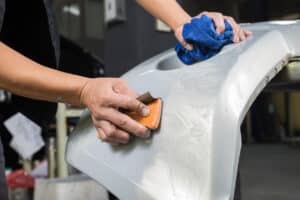
The process of wet sanding involves sanding the area with dampened sandpaper to create an even surface, allowing the existing paint to bleed into any gaps. However, it can be difficult to use the right pressure and avoid removing any deeper paint layers.
Wet sanding is a process intended to smooth out and remove small, surface-level scratches from car paint. A smooth, like-new appearance can be achieved when wet sanding is completed to a high standard. It can also help remove the orange peel effect, where car paint becomes pebbled and uneven, resembling the surface of orange skin.
You might think that using sandpaper on paint would cause more scratches, but the water/lubricant prevents the dust from clogging the sandpaper and causing more scratches.
When to wet sand vs other methods
When looking to restore your car’s paintwork to its former glory, there isn’t a one-size-fits-all fix. Even though wet sanding is a great method to have in your arsenal, it won’t fix everything.
Wet sanding will minimise scratches, but it won’t eliminate them entirely. Sometimes, simply polishing, compounding or using paint correction will be a more effective solution than wet sanding.
However, when fixing heavily scratched areas, wet sanding is usually the best choice because it effectively removes paint imperfections and levels the surface without the need for extensive repainting.
How to know if wet sanding is right for you
It’s important to know that wet sanding can’t fix all paint scratches and imperfections. For example, scratches deep enough to expose the metal layer can be much more difficult to repair. For these, wet sanding alone wouldn’t be enough.
However, scratches or imperfections in the clear coat or upper layers of paint can usually be restored with this method.
If you can feel the scratch with your fingertip, it’s probably too big a job for simple wet sanding; it’ll require dry sanding first. If the surface still feels smooth, then you can move on to the next steps without prior prep.
Safety precautions to take when wet sanding
As with most car repairs, safety is of paramount importance. Wet sanding might sound pretty harmless, but there are issues that can cause serious harm to you if you ignore precautions.
Dust is a likely irritant during wet sanding, so working in a well-ventilated area and wearing a dust mask will help to mitigate the harm. Safety gloves will also ensure that the sander doesn’t cause harm to your hands while sanding. You should also avoid working in direct sunlight to avoid overheating.
How to wet sand a car: Step-by-step
Wet sanding requires several tools and equipment. These are as follows:
- Sandpaper
- Sandpaper squeegee/handle
- Bucket and water
- Car cleaning solution
- Sponge
- Microfibre cloths
- Car wax
- Polishing compound
- A buffer
- Cloth tape
Armed with the right equipment, the in-depth steps below should give you all the information you need to wet sand any scratches or scuffs in your car’s paintwork.
Step 1: Assess the damage
Before doing anything, you’ll need to decide which sandpaper is right for the job. Light damage can be restored using just one type of sandpaper, while more significant scratches often require extra sanding.
For light scratches and scuffs or when working on a new paint job, you can usually reach for the 2000 or 3000-grit sandpaper straight away. However, it can be beneficial to start with 1200 or 1500 grit paper for scratches deeper than the clear coat of paint.
Step 2: Prepare the car
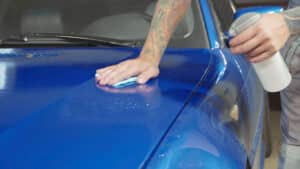
The car must be cleaned thoroughly using a sponge dipped in a specialist car cleaning solution mixed with water. Once the car has been cleaned and rinsed, it should be carefully dried with a clean microfibre cloth. Ensure there are no streaks or smudges since this can adversely affect the outcome of the wet sanding.
At this stage, the tape can be used to mask off the panels you’ll be working on. Our general-purpose and premium cloth protection tapes provide the perfect tape solutions because of their highly adhesive, moisture-resistant, and temperature-resistant properties. These will guarantee that adjacent panels remain unaffected during the sanding and buffing processes. Using tape, you can mask trims, emblems, lights, panel edges, and apply multiple layers to critical areas to avoid seepage.
This is also the ideal time to apply PPE before you begin.
Step 3: Wet the sandpaper
Fill a bucket with water and add a small amount of automotive soap. This will provide the lubricant for the sandpaper to prevent it from burning the paint when force is applied.
Cut your sandpaper in half lengthways so that it fits against the squeegee or handle and soak the bottom half of each section in the bucket of water for around 5 minutes. The lower portion of each strip should be fully saturated in soapy water, and the top half should remain dry to help it attach to your squeegee or handle.
Step 4: Begin sanding the affected area
Once you’ve attached a suitable grit of sandpaper to your chosen sanding tool, you can begin sanding in an over-lapping, circular motion, applying light pressure as you go. It can take time to determine how much pressure is required, so take your time with this step. Too much pressure can damage the deeper levels of paint and make the process more difficult.
It’s best to ensure you’re working under good lighting and wipe the surface often to check progress.
You should notice the colour from the paint bleeding into the water and tinting it, which then begins to seep into the scratches and scuffs.
If the water darkens, this is usually a sign that you’re applying too much pressure.
It’s also important to keep an eye on your sandpaper and check that it doesn’t become dry during the sanding stage. The heat from dry sandpaper can burn the paint and cause more scratches or scuffs.
Add water as necessary and swap out the strips of sandpaper if they become too soggy or dry. You should also check the tape after sanding to ensure it hasn’t lifted or allowed water underneath.
Remember, you’ll need to repeat this step first with lower-grit sandpaper and then with higher grit for deeper scratches. For lighter damage, you can skip straight to the higher-grit sandpaper.
Step 5: Treat the sanded area
Rinse off any soap or debris from the area and dry thoroughly away from direct sunlight. The buffing process can then begin with a buffing pad and polish at a medium speed using low pressure. Again, too much pressure can burn the paint and cause issues with your finish, so start gently.
Finally, apply wax to the area to add a layer of protection for the paint. Wet sanding can cause a slight dip in the affected area, and wax can help build this back up. Wax should be applied with a soft cloth using gentle circular motions. A high-quality wax can make a huge difference at this stage, so it’s worth investing a bit more into the wax you use. This method should provide an even finish, so long as you gently wipe away any excess once you’ve finished and allow it to dry fully.
Common mistakes when wet sanding
Wet sanding is a job that requires patience, skill, and the correct tools. Any one of these factors going awry could spell disaster for your paintwork.
Using the wrong grit or dry sandpaper
Start with 1500–2000 grit and soak it beforehand to avoid deep scratches.
Applying too much pressure
Use light, even strokes; let the sandpaper do the work.
Not keeping the surface and paper wet
Dry spots cause heat and scratches; mist regularly with water.
Poor masking or surface prep
Failing to tape off areas or clean properly can lead to unwanted damage and uneven results.
Over-sanding edges or skipping polish
Edges are vulnerable to burn-through, and sanding without polishing leaves a dull finish

Tips for achieving the best results
Looking to improve your wet sanding skills? Below, we’ll go through our top tips for producing a high-quality finish.
Use cloth tape to protect adjacent panels
Wet sanding can be concentrated on specific panels, so using high-quality cloth tape can guarantee the non-damaged panels stay that way.
Avoid using a sander
A sanding machine might seem time-efficient, but it can leave swirls in the paint and provides much less control than hand-sanding.
Use gentle pressure to start
It can be easy to sand too deep and damage the car’s paint, so take care when beginning the sanding process.
Sand in straight lines
Creating an evenly-sanded surface can be much easier when the sandpaper is rubbed in back-and-forth motions using the same pressure levels.
Use the right tape to mask areas
When wet sanding, you want to avoid seepage that can occur with low-quality tape. By using a high-quality tape from JTAPE, you can sand with confidence. Black Premium Cloth Protection Tape protect your paintwork effectively.
For more information about our full range of helpful JTAPE products, please visit our online store, or contact us to find your local distributor.


